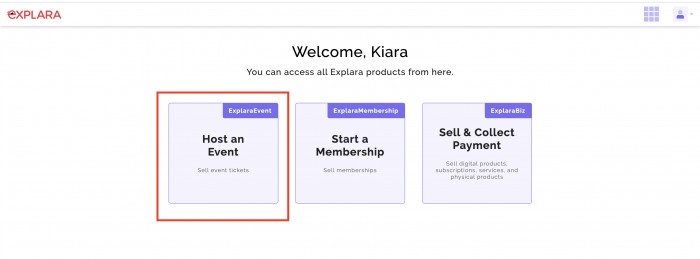
Please login to explara.com. You are taken to your dashboard. You will see a list of all the solutions Explara provides to you in the form of cards. Please select the "ExplaraEvent" card and you are on the “My Event page”.
On the top right corner, you will see a " Create Event " button. Click the same button and Create Event form loads up.
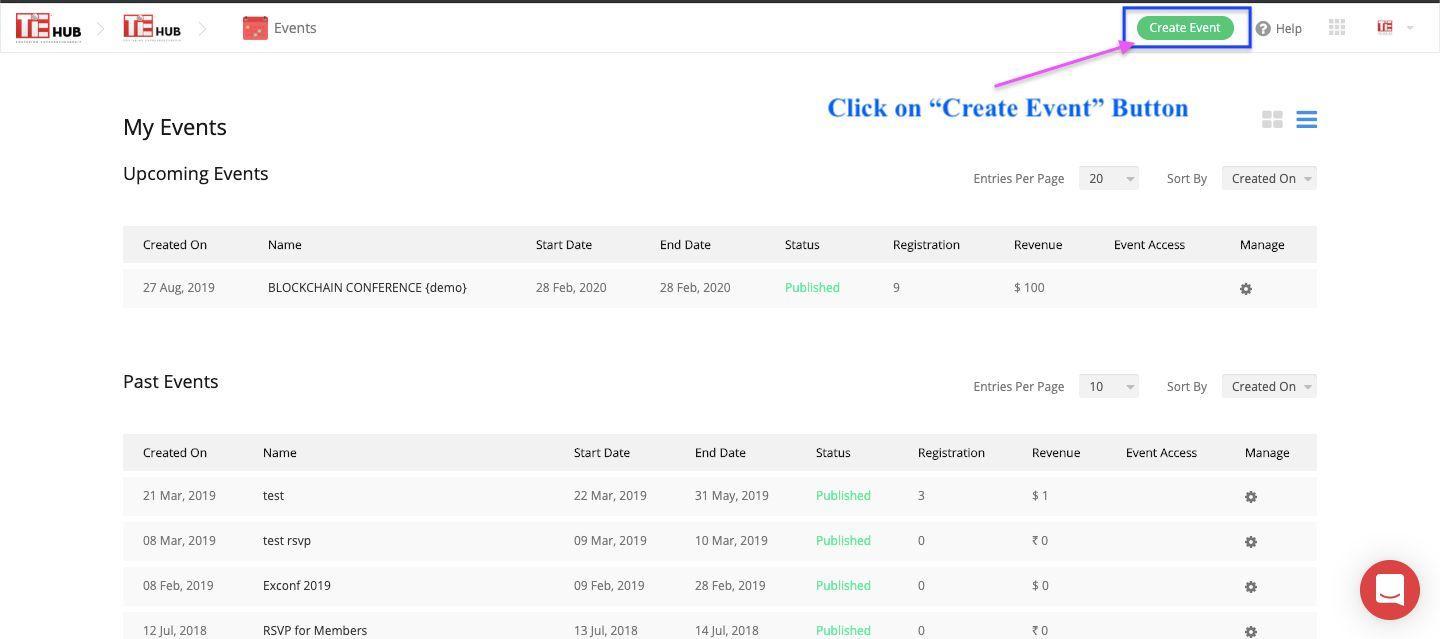
You need to enter the Event Title, A brief description, Event Venue, select the event landing theme, upload a cover photo and then select an event type. After that, click on the Create button at the bottom of the form.
Public Event:- Once an event is created and it is selected as" Public", anybody can buy the ticket of the event to attend.
Private [Invitation Only]:- On the contrary to Public event, where anybody can join, this Invitation-only Event restricts people. Only those people who are invited through the explara system would be able to register for the event. The invite should must go from the Explara dashboard only. Those who are not invited would be able to see the event page, but the Buy Ticket /Register button be visible to them. However, they should be able to ask for an invitation from the organiser by clicking the Request Access button.
Ticketing:- This is best suited for Entertainment, sports or events of similar nature. Where
the nomenclature is used such as Buy Ticket, Issue Ticket, Ticket Details etc.
Registration:- This nomenclature is best suited for Business events, Conferences, workshops seminars etc. In this type, the buttons or the wording changes to Register, Issue Pass, close Registration and so on.
RSVP:- This is a type of event where you just want to count the confirmation of attendees who are committed to attending your event. This is mostly a free event where no payment is needed to be paid by the attendees.
As an organizer, you have the options to select the theme for your event landing page. There are mainly three landing pages for your event and each landing page has a different header/ cover photo.
Default theme: The size & dimension of the cover photo is less than 1 MB and 924px X 530px respectively.
Minimal theme: The size & dimension of the cover photo is less than 900 KB and 1440px X 715px respectively.
Split theme: the size & dimension of the cover photo is not exceed 900KB and size 862px X 824px respectively.
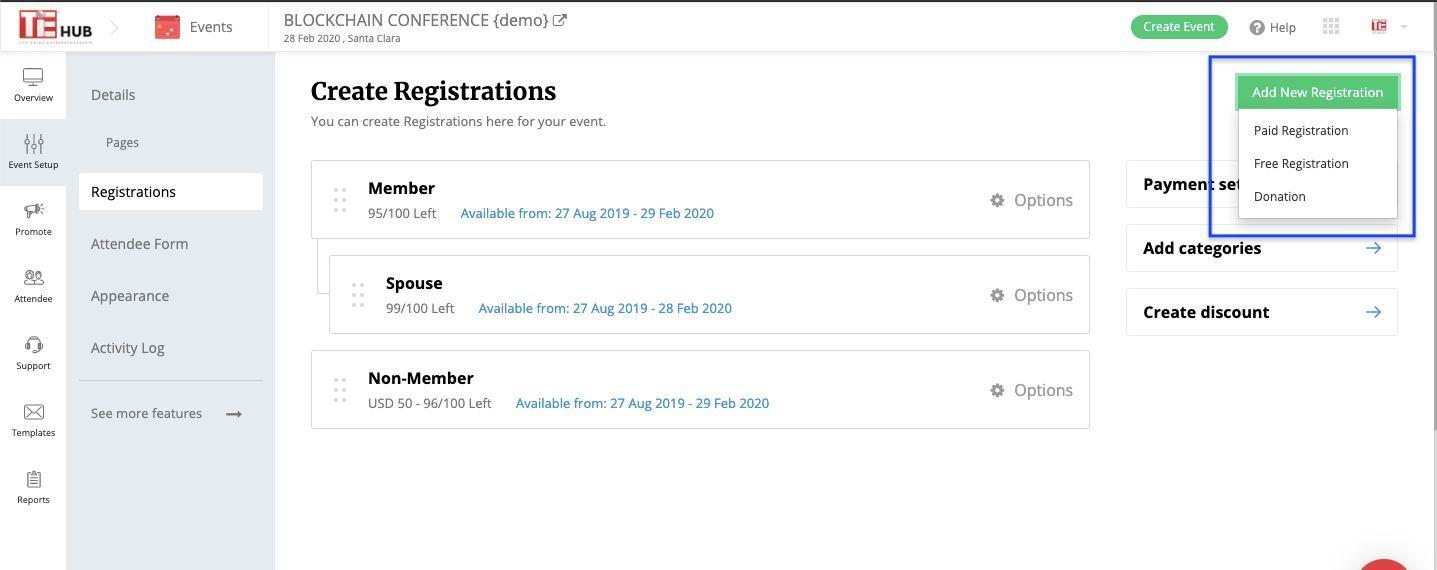
Once you login to your event dashboard, you click the "manage" button of the event to which you want to add tickets. Click the main menu "Event setup" and then the sub-menu named Tickets/Registration. On the top right corner, you see an option "Add Ticket/ Add Registration". You will see options to add Free/Paid/Donation tickets. Please select any one of these as per your requirement. You just need to enter the Ticket name, inventory and price and then save it.
Code Discount:- This will allow the organiser to create various codes which can be shared to the specific set of Buyers to avail the discount.
Bulk Discount:- This discount can be created when the event organiser decides to give discount in case the buyer buys more than X number.
Flat Discount:- This discount is created in case the organiser wants to offer a discount on a ticket for a specific period of time. This is best suited when you want to have only one ticket type but the same ticket is used over the period of time with a varied discount and pricing.
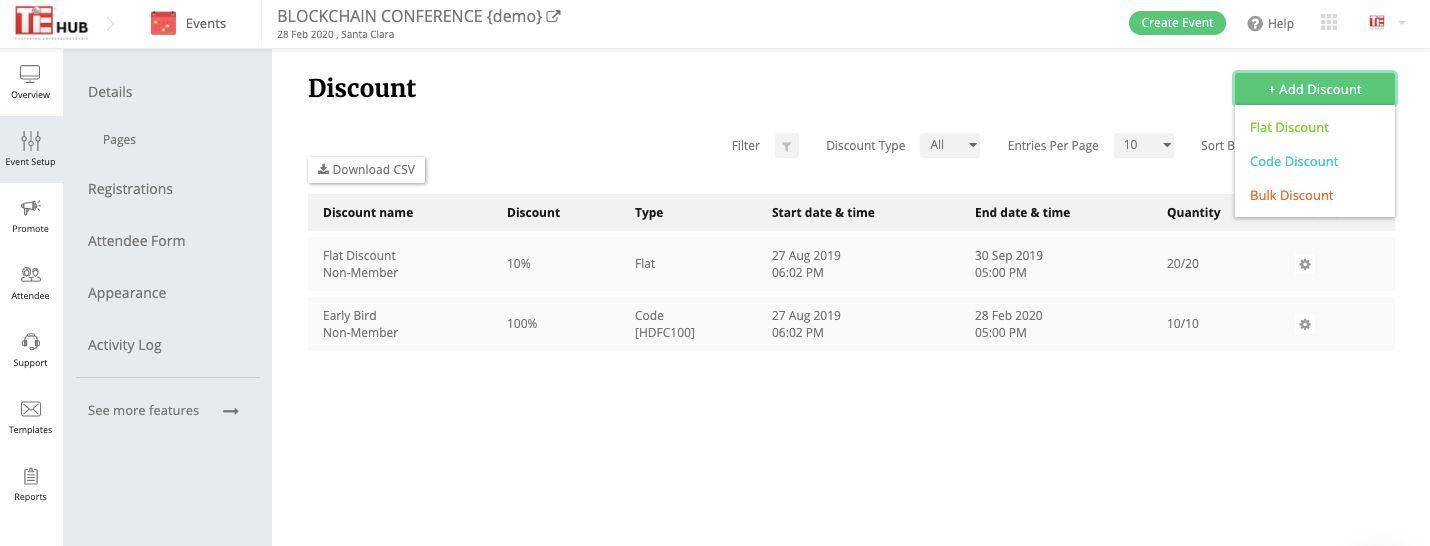
To create discounts, you can go to the event setup menu and then click on “See more features”. Scroll to the bottom of the page and then click on “Discounts”. Then you click on the create discount button and select the type of discount (Code / Bulk / Flat) and enter the details.
Or alternatively, you can go to Event Setup // Ticket or registration. Then click on the “Create Discount” on the right. Followed by the steps mentioned above.
In every Event, two forms can be extended. One is the Buyer Form and the other is the Attendee Form. The Buyer form is a mandatory form whose data is needed to process the payment online. However, Attendee form is an optional form to capture the attendee data. There are two ways an attendee form can be added; one at the event level which is the default option and the second one is at the ticket/Registration level. If you want to capture data of the registrants based on the ticket/registration type, please opt for ticket level attendee form. To enable this, go to Event Setup // Attendee form. By dragging and dropping label types, you can create a form.
1. Cheque Payment
2. Bank Deposit
3. Venue Payment.
In order to enable this, please go to the Registration/Ticket page and on the Right side panel, you will see payment option. Please click that and look for Offline payment Payment Processor. Under this, you find all three offline payment options. Enable one or more as per your suitability.
The Speaker can be added as a menu on the event landing page if one of the themes is selected. Under Event Setup/See More features, there is an option named "Speaker". Using this, Speaker can be added. Once the speaker detail is added here, the Speaker will be automatically added as a Menu on the event landing page for the default theme and the details of Speaker will be available on the event landing page.
In the case of other Themes, you need to go to Appearance/Edit Theme. Then Click on Body, you will see Speaker menu. Click on it and you will see an option to enable the Speaker module for the event landing page
Now to add this as a Menu, please go to Navigation under Header and then click on "Add" to add the Speaker menu from the drop-down.
The Sponsor can be added as a menu on the event landing page if one of the themes is selected. Under Event Setup/See More features, there is an option named "Sponsor". Using this, the Sponsor can be added. Once the Sponsor detail is added here, the Sponsor will be automatically added as a Menu on the event landing page for the default theme and the details of Sponsor will be available on the event landing page.
In the case of other Themes, you need to go to Appearance/Edit Theme. Then Click on Body, you will see Sponsor menu. Click on it and you will see an option to enable the Speaker module for the event landing page.
Now to add this as a Menu, please go to Navigation under Header and then click on "Add" to add the Sponsor menu from the drop-down.
There is a placeholder to add Youtube video on the event landing page. This can be done through Event Setup/See more features. , there is an option "Video Gallery". Through this, videos can be added.
In some of the events, organiser wants only unique attendees. This means, one person shouldn't buy more than one ticket under any circumstances. In order to do so, the setting options are provided under Event Setup/See more features/Settings. Under this, there is "Other settings" and it has options to enable Unique Buyer and Unique Attendee options .
There is a place holder to add SEO details for the event landing page. This can be done through Event Setup/See more features. Under this, there is an option SEO Details. Through this, Meta tag, Meta description Meta keyword would be added.
Can I add my tracking script to check conversion?
Explara provides the feature to use google analytics tracking code or any other tracking script to be embedded into the Event page. This can be done from the event Setup. Go to Event Setup/See More features, you will see a card named Tracking Tools . Click this one to add your tracking code or GA Code or any other tracking scripts. The tracking script can be added on the event Landing page as well as on the confirmation page.
Buyer list holds the Buyer information and Attendee List holds the attendee Information. If you have Enabled Attendee Form to capture more data of your attendees then those data will be available under Attendee/Attendee List.
Explara provides certain system-defined email templates which are editable to a larger extent. In order to find the list of email templates, please click the manage icon of the event. You will see a couple of menus on the left side, you see the main menu named " Email Templates ". Click this one and you will all the system-defined email templates. Select the one you want to edit.
You will find editable blocks and edit/delete icons. You can use these to make changes to the template. Also, you can add additional blocks from the left side "Element Block". You can make other changes by using the "Settings" option that gives a broader handle to make changes to the template.
Explara provides a feature to issue Guest Tickets. Please go to Attendee/Guest Registration and select the ticket you want to issue to your guests. Enter the email Id in a particular format that is mentioned there and clicks send. Use the CSV upload option if you want to issue Guest tickets in Bulk. This helps you to release tickets for VIP, sponsors, speaker etc.